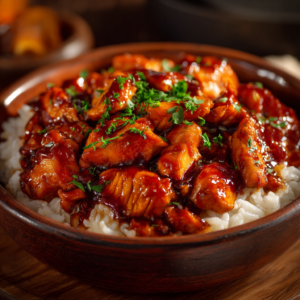
Sweet and Sour Chicken is one of those timeless dishes that instantly sparks cravings. The moment tender, golden-fried chicken meets that glossy, vibrant sauce—perfectly balanced between tangy, sweet, and savory—you know you’re in for something special. It’s the kind of recipe that feels indulgent and comforting, yet surprisingly achievable at home, even on a busy weeknight.
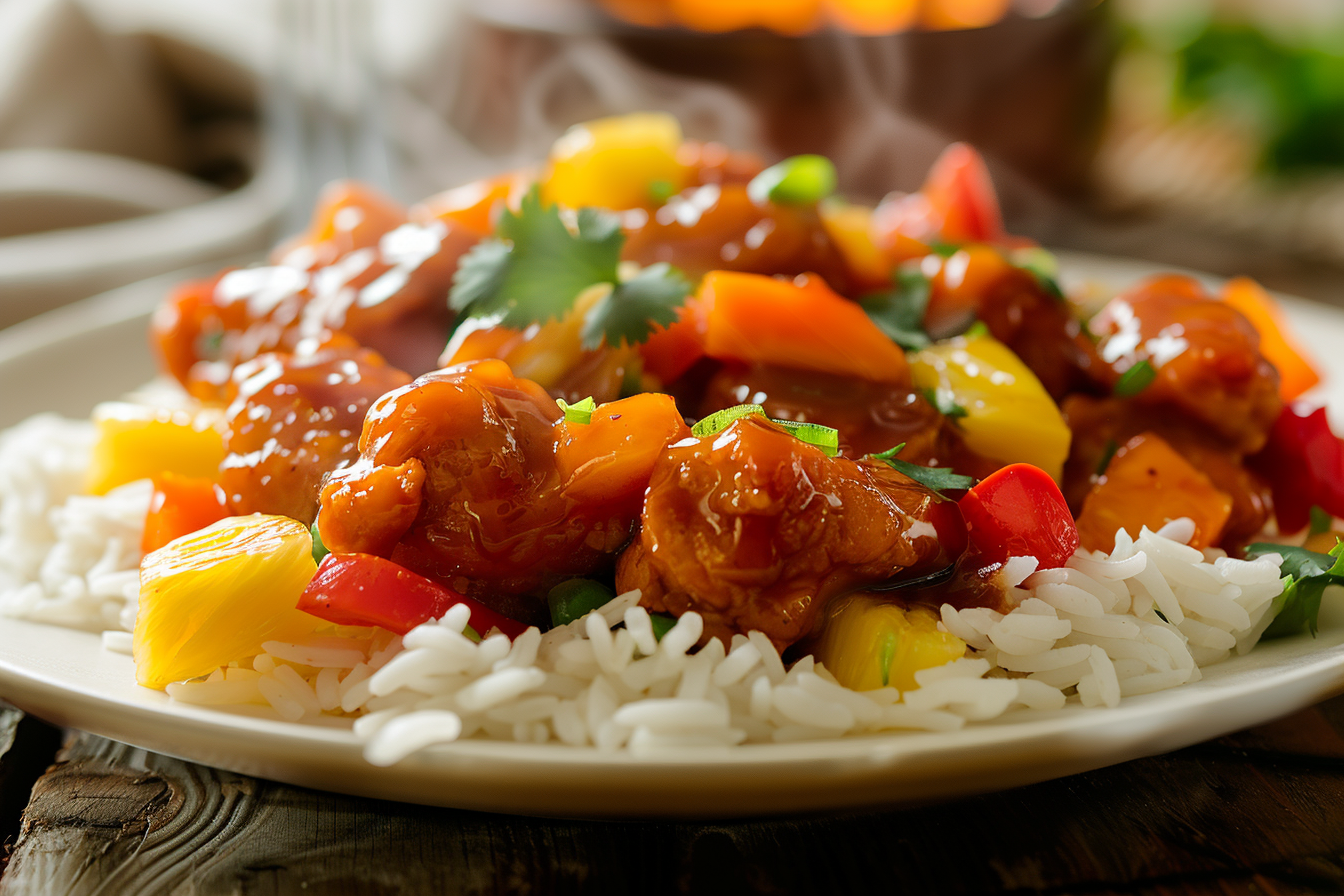
What makes this dish so irresistible is the contrast: crisp chicken coated in a sticky, colorful sauce infused with pineapple, peppers, and a punch of umami. Every bite delivers bold flavor and satisfying texture, just like your favorite takeout—but fresher, lighter, and made exactly the way you love it. No mystery ingredients, no soggy leftovers, just pure sweet-and-sour perfection.
This homemade version is designed for real kitchens and real cooks. Whether you’re cooking for family, impressing guests, or simply craving a restaurant-style meal without leaving home, this recipe walks you through each step with confidence. Once you see how easy it is to recreate that iconic balance of flavors, this Sweet and Sour Chicken is bound to become a regular in your rotation.
Keep reading—you’re just minutes away from mastering a classic that never goes out of style 🍍🍗✨
Why You’ll Love It
This Sweet and Sour Chicken recipe delivers everything people love about the classic takeout dish—but with better texture, fresher flavor, and full control over the ingredients. It strikes that ideal balance between crispy, juicy chicken and a bold, glossy sauce that’s tangy, sweet, and deeply satisfying.
One of the biggest reasons this recipe stands out is its texture contrast. The chicken is coated and fried until perfectly golden, creating a crisp exterior that holds up beautifully once tossed in the sauce. Unlike restaurant versions that can turn soggy quickly, this method keeps the chicken crunchy longer, even after mixing.
You’ll also love how approachable and flexible this recipe is. The ingredient list is simple, the steps are clear, and nothing requires special equipment or hard-to-find items. It’s weeknight-friendly yet impressive enough to serve guests.
Another highlight is the homemade sweet and sour sauce. It’s vibrant, balanced, and customizable—less sugary than many store-bought versions, with just the right amount of acidity to keep each bite lively. You can easily adjust the sweetness or tanginess to suit your taste.
Most importantly, this dish brings comfort and nostalgia without sacrificing quality. It tastes like your favorite takeout order—but fresher, brighter, and made with care in your own kitchen.
Ingredients + Tips
Chicken
Boneless, skinless chicken breast is the most common choice for sweet and sour chicken. It cooks quickly and stays tender when cut into evenly sized pieces. Chicken thighs can also be used if you prefer juicier, more flavorful meat.
Tip: Cut the chicken into uniform bite-sized chunks to ensure even cooking and maximum crispiness.
Coating
A simple combination of cornstarch and flour creates a light, crisp coating. Cornstarch is key here—it helps the chicken fry up extra crunchy and prevents heaviness.
Tip: Don’t overcrowd the pan when frying. Frying in batches keeps the oil temperature stable and ensures a golden, crispy finish.
Vegetables & Fruit
Bell peppers and pineapple are classic additions that provide color, sweetness, and texture. Fresh pineapple delivers the brightest flavor, but canned pineapple works well too.
Tip: Reserve pineapple juice for the sauce—it adds natural sweetness and acidity.
Sweet and Sour Sauce
The sauce typically includes ketchup, vinegar (rice or white), sugar, soy sauce, and pineapple juice. The result is a glossy, well-balanced sauce that clings beautifully to the chicken.
Tip: Taste the sauce before thickening and adjust—add more vinegar for tang or a touch more sugar for sweetness.
Steps (Crispy Chicken & Sauce)
Step 1: Prepare the Chicken
Pat the chicken pieces dry with paper towels. This removes excess moisture and helps the coating stick better. Season lightly with salt and pepper.
In a bowl, toss the chicken with cornstarch and flour until evenly coated. Shake off any excess coating.
Step 2: Fry Until Crispy
Heat oil in a deep skillet or pan over medium-high heat. Once hot, fry the chicken in batches until golden brown and crisp on all sides. Transfer to a wire rack or paper towel-lined plate to drain.
Key Tip: Don’t rush this step—proper frying is what gives the chicken its signature crunch.
Step 3: Make the Sauce
In a saucepan, combine ketchup, vinegar, sugar, soy sauce, and pineapple juice. Bring to a gentle simmer, stirring until the sugar dissolves.
Mix a small amount of cornstarch with water and stir it into the sauce. Cook until thickened and glossy.
Step 4: Cook the Vegetables
In a clean pan or wok, sauté bell peppers and pineapple briefly over high heat. You want them tender-crisp, not soft.
Step 5: Combine & Serve
Add the crispy chicken to the pan, pour the sauce over everything, and toss quickly to coat. Serve immediately for best texture.
Variations
One of the strengths of Sweet and Sour Chicken is how adaptable it is.
-
Baked Version: Skip frying and bake the coated chicken at a high temperature until crispy, then toss with sauce.
-
Air Fryer: Air-fry the chicken for a lighter option that still delivers crunch.
-
Spicy Twist: Add chili flakes or a splash of sriracha to the sauce for heat.
-
Vegetarian Option: Use crispy tofu or cauliflower in place of chicken.
-
Low-Sugar: Reduce sugar and increase pineapple juice for natural sweetness.
These variations allow you to tailor the recipe to dietary needs or personal preferences without losing its signature flavor.
Storage & Reheating
Sweet and Sour Chicken is best enjoyed fresh, but leftovers can still be delicious when handled properly.
Storage
Store leftovers in an airtight container in the refrigerator for up to 3 days. For best results, store the chicken and sauce separately if possible.
Reheating
-
Stovetop: Reheat gently in a pan over medium heat, adding a splash of water if needed.
-
Oven: Spread on a baking sheet and heat until warmed through.
-
Avoid microwaving if you want to preserve crispiness—it tends to soften the coating.
Serving Suggestions
Sweet and Sour Chicken pairs beautifully with a variety of sides:
-
Steamed jasmine or basmati rice
-
Fried rice or egg fried rice
-
Noodles or lo mein
-
Stir-fried vegetables
-
Light cucumber salad for contrast
Garnish with sesame seeds or sliced green onions for a polished finish.
Final Thoughts
Sweet and Sour Chicken
Ingredients
Method
- Prepare the Chicken
- Pat chicken dry and season with salt and pepper. Toss with cornstarch and flour until evenly coated.
- Fry the Chicken
- Heat oil to 175°C / 350°F. Fry chicken in batches until golden and crispy. Drain and set aside.
- Make the Sauce
- In a saucepan, whisk ketchup, pineapple juice, sugar, vinegar, and soy sauce. Simmer gently.
- Mix cornstarch with water and stir into sauce until thickened.
- Cook the Vegetables
- In a hot pan, sauté bell peppers and pineapple for 2–3 minutes until tender-crisp.
- Combine
- Add chicken to the pan, pour sauce over, and toss quickly to coat.
- Serve Immediately
- Garnish with sesame seeds or green onions if desired.
Sweet and Sour Chicken is more than just a popular takeout dish—it’s a perfect example of how balance transforms simple ingredients into something unforgettable. When done right, it delivers crisp texture, bold flavor, and that unmistakable sweet-tangy glaze that keeps you coming back for another bite. This homemade version proves that you don’t need a restaurant kitchen to recreate a classic at its best.
What makes this recipe especially rewarding is its versatility. It adapts easily to different cooking methods, dietary preferences, and flavor adjustments, making it a reliable go-to whether you’re feeding a family or cooking just for yourself. Once you master the crispy chicken and sauce combination, you’ll find endless ways to make it your own.
Cooking this dish at home also means fresher ingredients, better texture, and a sauce that’s balanced to your taste—not overly sweet, not sharply sour, but just right. It’s comforting without being heavy, vibrant without being complicated, and impressive without requiring advanced skills.
Perhaps the best part is the satisfaction of serving a dish that looks and tastes restaurant-worthy, knowing you made it from scratch. Sweet and Sour Chicken has a way of bringing people to the table, sparking conversation, and delivering pure comfort in every bite.
If you’re looking for a recipe that’s dependable, crowd-pleasing, and endlessly crave-worthy, this is one you’ll come back to again and again. Once you try it homemade, takeout might never taste quite the same.